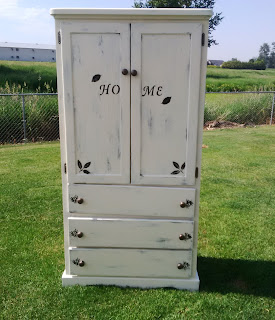
Hey, Everyone! I am SO excited to show you my latest project! I wasn't sure what to do with this armoire, we've had it for a couple of years and were previously using to store my husband's barn clothes in our mudroom. But since he no longer needs to use it, I've decided to add some colour to it and try some stencilling! This armoire was built by my husband's grandpa, so we wanted to keep it in the family. :) The first few photos show how the bare wood was untouched- a refinisher's dream come true! Since it was like having a blank canvas, it was easy for me to visualize what to do with it. I decided to paint a black base coat, and then use Annie Sloan Chalk Paint in Old White on top. The results are fantastic!
Since I decided to try something new by adding some stencils to the armoire, I tried one on the back to make sure. I was really happy with how it turned out but I decided to use black paint instead of red.
After the initial coat of black acrylic paint, I let it dry for a day and then used my "brushed" technique with the Old White paint on top. Next came the challenge of stencilling!
I stencilled "HOME" on the two main cupboard doors.
After stencilling the doors, I decided to add some stencilled leaves on each drawer.
Since the armoire was black and white, I spray painted the knobs and hinges in a chocolate brown colour to add some warmth to the look. It took two coats of spay paint and two coats of clear protective spray to get this look.
Thanks for taking a look at this post! I'm so thrilled with my latest skill learned and how well this armoire turned out! :)
*The leaf stencils I used were various ones from Martha Stewart's collection. The lettering were basic ones I found at Michael's Crafts Store


