Friday, May 27, 2016

Beach Cottage Feel


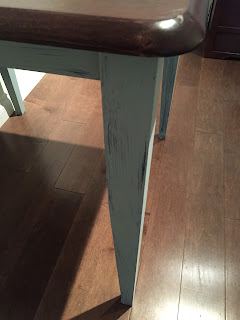
Hey, Everyone! I am so excited to share my latest project with you! I was recently contacted by a client who wanted her bedroom furniture updated. She wanted a "beach-cottage" feel and for it to be painted with chalk paint. Chalk paint is fantastic because of its durability and how easily it can adhere to wood without need any sanding or priming. One of my favourite stores, Spruce Collective, recently debuted their new line of chalk paints called, "Shelter by Spruce Collective." Originally, we were going to go with their light green colour called Beach Glass. It looked amazing, but when we went to the store, we realized it was more green than what we were looking for, so we went with Succulent. Succulent is a gorgeous blue/grey toned paint, it was just perfect for our beach look. What really amazed was the coverage this paint has... it only took one coat of paint to achieve our look (which is usually unheard of!) and after refinishing two dressers, two night stands and a table, we only used half of a can! I'm incredibly impressed with the quality and how far this paint goes! 


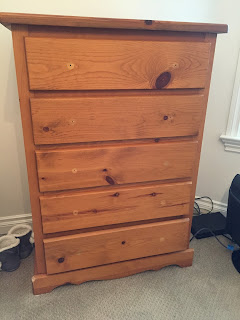
 Here are all the "before" photos of the dressers and night stands. After laying a tarp down and setting everything up, it was time to test the paint. 


I used a dry brushing technique on the furniture to create a naturally distressed look. This paint was nice and thick, so only one coat was needed. This project took hardly any time and dried so quickly. Because the paint is so durable, it passed all of my tests so I ended up leaving it without any protective coating. 


Since we used just barely half of the paint can, my client had a table she was hoping to turn into a desk so I suggested that I paint the base to give it more character. The results were fantastic! :) 


I absolutely can't say enough good things about this chalk paint! The quality is amazing and the colour ended up being the absolute perfect fit. It creates a tranquil look, cozy and calming and completely changes the look of the whole room! It's always such a great feeling to see a happy client and to know you've helped make a transformation that will last for years to come. :) 


Feel free to "like" our Facebook Page at: http://www.facebook.com/hollyshomestead


Monday, May 23, 2016

Creating A Coffee Bar


Hey, Everyone! I know it's been a while, but I'm so excited to finally be able to share one of the many projects I've been working on lately. Ever since we moved to our apartment, we realized that we need more counter space. Our kitchen is very cute and cozy, but we have a very large microwave that takes up a lot of space, and with coffee machines and all the other small appliances, we realized extra storage would be a bonus! Ever since I saw the idea of a coffee bar on Pinterest, I knew that would be the perfect addition to our place. We searched around quite a bit after we first moved, hoping to find the perfect piece of furniture to refinish for our space, but we just weren't having any luck. Then, out of the blue, I saw this lovely piece on Abby Bidding Wars and decided to put in a bid. To be honest, because of work and everything else going on, I completely forgot that I had put in a bid on it, so the next evening when my husband asked me if I'd seen how the auction went, I gave him a "deer in the headlights" look. Thankfully, he reminded me because as it turned out, my bid actually won! :) I honestly never thought I would win it, so I never actually measured our space to see if it would fit. But just our luck, the measurements ended up being perfect, so it was definitely meant to be! 


I decided that because we're in an apartment, sanding it down and restraining the top isn't a good option for now, but we will be doing it in the future. I really wanted to make this piece feel cozy and welcoming, so we decided to try out Rustoleum's Chalk Paint in Charcoal Grey. I was so impressed by how well it adhered to the already painted wood, I ended up doing two coats, the quality and price for the paint is very impressive! 


After pulling out the drawers, knobs and taking the doors off, I taped the underside of the top of the cabinet, where it hangs over the ledge so I wouldn't get paint on the stain. I'm a bit of a perfectionist, so I didn't want any paint where it was stained, some people don't mind, and most people wouldn't notice, but I'm just particular. :) 


Here's a photo of the test piece. I painted the inside of the doors with a first coat, already loving the colour! 


After a second coat, the paint looked solid with such a nice matte finish! 


Once everything was double coated, I went over the cabinet with some polyurethane for protection. I was so tempted to leave the cabinet as is, but because it's going to be a coffee bar, where things might spill and clumsiness happens (in our house especially!), I figured it wouldn't be worth the risk. For a piece like a dresser or night stand, I probably wouldn't have coated it, or possible have used wax on it for a nice finish. This chalk paint is very durable. 


What an easy thing to do, it took me only an hour to do this whole project, and yet it's a massive difference from what it was. This coffee bar is now a staple in our kitchen, it's eye catching, welcoming and a huge space saver! I'm pretty thrilled! 


And of course, our dog, Rebel, wanted in on the photos. Can't resist that cute face trying to understand why I was taking so many pictures! 


Check out our Facebook Page at: http://www.facebook.com/hollyshomestead